Showing posts with label tutorials. Show all posts

diy makeup tutorial: make your own cream blush
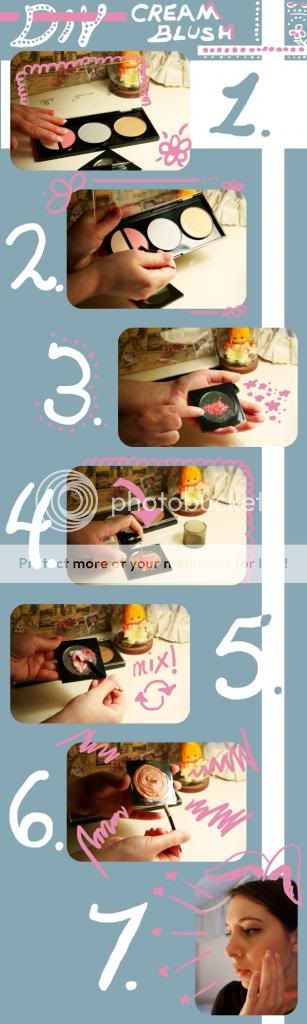

Love the smooth, silky application of cream blush, but can't justify putting any more cash toward your cosmetics stash? (Guilty as charged, officer.) If you've got an extra palette of powder blush or pink eyeshadow gathering dust at the bottom of your makeup bag -- say, one of those questionable off-brand kits well-meaning relatives hand out on holidays -- you're good to go for making your own cream version.

Step the First: 
Find a powder color you'd like to see in a cream blush. If you don't like what you've got, you can color-mix a few different powders, or add a plain shimmer powder.

Step Two:  
Scrape a few chunks of powder into a clean makeup palette, compact or container. You'll see here that I used the back side of a lip brush to do the scraping, but any hard-edged tool will do.

Step Three:
Crush the chunks into a fine powder -- as fine as possible! Any large crumbs will make the end result look like sprinkles in pudding.

Step Four:
Pour a few drops of your regular foundation into the powder -- but not too much, or the foundation's undertone will change the blush color. I wanted a peach blush, so the yellow undertone in my foundation was a plus, but you might want to keep yours more on the pink side.

Step Five:
Add cream. Face cream, that is, and the thicker, the better. Runny lotions and moisturizers won't work, but a heavy facial cream or shea butter makes a good base. Remember -- the less cream you add, the bolder the blush color.

Step Six:
Mix well with whatever stirring tool you're willing to sacrifice and let the cream set for a while. If the mixture is too goopy when you go to put it on, stick it in the freezer to make it harden up faster.

Step Seven:
Apply the blush with your fingertips and enjoy that healthy exercise glow without needing to actually, you know. Do anything.

Read more...

t-shirt to dress tutorial: no disintegrations necessary


A few weeks ago, while cleaning out a memory box from high school, I came across a pile of oversized T-shirts. Most of them were the kind you really can't use again, like team sports championships shirts or stuff from community theater productions. Buried somewhere at the bottom, however, was a shirt I wore practically daily back then.


If anyone was unaware of my geekinesss before...  In fact, I'm pretty sure I also had a similar shirt with storm troopers, and another with Marvin the Martian. (Wonder what happened to those.) Since I didn't want to relegate this one to sleepwear, I gave a go at turning it into something new.

Want to know how to turn your sad, old T-shirts into slightly-less-sad dresses? Here's what I did:
(Be warned, this'll be some pretty basic T-shirt surgery for veteran restylers. You may still be entertained by my incompetence, however.)


Meesh Muffet's Guide to T-Shirt Mutilation


Cut the armhole seams apart, then cut the sleeve side seams open.

Pin the open armhole edges together to stabilize them. Curse when you realize the shirt's been made just asymmetrically enough to screw with you.


Chop off the top of the shirt, leaving at least 1 inch between the top and the lettering.

Realize you can't do what you want with the shirt due to the armhole placement. Eat entire row of cookies until a new plan emerges.

Create new side seams that encompass the stupid armholes. Put the shirt on as though it's a strapless tube dress, and adjust the pins until they fit you like you want.

Have minor panic attack trying to get out of dress with pins still in it.


Adjust pins so that they're even on each side. Bite the bullet and wrestle yourself back into the dress again to double check the fit.


Sew the side seams. Complain to anyone who will listen about lack of overlock stitch on machine. As no sympathy is forthcoming, stretch the fabric as you sew instead.

Cut the seam allowances to 1/2 inch and iron them open so that you can see how the seams fall on your body. 

Decide you like the dress better if Boba Fett is off-centered. Twist dress around to side. Curse when you realize you now have to tweak the side seams so that they don't make weird bumps.


Fold the top edge under and pin it. (I used 3/4 inch so that there was some space between the design and the top of the dress.) Sew.

Waffle about what to do with the sleeves. Walk away from the project for a few days, only to come back and realize that the neckline is what needs help.


Fold in the edges of a little rectangle of fabric and sew them down. Greatly overestimate how much length you'll need.

Put the dress on. Pinch the top of the dress together in the center to create a sweetheart shape.

Pin the bottom edge of the little rectangle to the outside of the dress, where your bottom finger rests. Pin the top edge of the little rectangle to the same spot inside the dress. Stab your finger with one of the pins and bleed everywhere. But luckily not on the dress.


Get out of the dress alive and sew across the bottom of the little rectangle, through all layers. Sew sloppily enough that you have to rip out all the stitching and do it again.

Make a few more little rectangles, this time much thinner and longer, to use as spaghetti straps. Enlist long-suffering sister to help you pin them to the front and back of the dress.

Sew the straps where they're pinned, on the inside of the dress. Wear new dress triumphantly.


Realize that you now have the phrase "negotiable rates" written across your butt. Decide that you don't care.

Much.

Read more...
Related Posts Plugin for WordPress, Blogger...

current inspirations

search me

Photo Info

All personal photographs taken by me unless otherwise stated. Not that you'll want them, but please drop me a message first for permission before using my pictures elsewhere. granniesguide@gmail.com

  © Blogger template Shush by Ourblogtemplates.com 2009

Back to TOP